Pest Control

Rodents – What You Need to Know About Rodent Removal

Rodents pose a threat to your home and family. They cause property damage through nesting, gnawing on wires, and contaminating food sources. Rodents spread diseases, such as salmonella and hantavirus.

The best way to prevent rodents is to maintain sound housekeeping, eliminate loosely piled building materials, and use caulk or steel wool to fill cracks and holes around doors and windows. For more information, click the Rodent Retreat to proceed.

Rodents eat, contaminate, and damage food supplies, contaminate living spaces and equipment, and transmit diseases that cause illness to people. Removing their food, water, and shelter is the best way to prevent rodent infestations. Sanitation also plays an important role. Regularly sanitize kitchen counters, garbage cans, pet feed bowls, and trash bins inside and outside. Store dry foods in metal or plastic containers and seal birdseed and pet food. Remove weeds and overgrowth that provide hiding places.

Rodents chew through wood, drywall, insulation, and electrical wiring and are responsible for millions of dollars in structural damage each year. Rodents also spread disease-carrying parasites such as fleas, ticks, and mites that can bite people and transmit diseases such as bubonic plague, typhus fever, Lyme disease, and Rocky Mountain spotted fever.

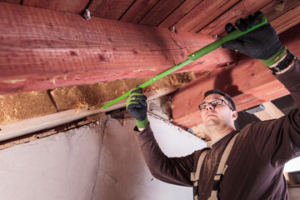
Routinely inspect the interior of your home, including attics and crawlspaces, for signs of rodent activity. Look for droppings, rub marks (sebum(grease marks), and gnaw holes in the walls. Listen for scratching noises at night. You may need professional extermination services if you find evidence of rats, such as droppings or greasy rub marks, dark sebum(grease) spots in corners, or a thick layer of shredded paper on the floor.

Regularly remove piles of debris and clutter in the yard, providing hiding places for rodents. Prune shrubs and vines that grow into buildings and other structures, especially those growing on or over roofs. Remove places to hide, such as cluttered garages and sheds, tall grass, overgrown weeds, discarded machinery, stacked firewood, and plants that touch the side of your building like ivy.

Reduce their access to water by repairing leaky hoses and spigots, draining puddles, and preventing water buildup around foundations and eaves. Plug holes in the exterior of your home and outbuildings with steel wool, concrete mortar, or heavy gauge 1/4 inch hardware cloth. Use caulking and weather stripping to seal any openings. Use lath screen, cement, or galvanized sheet metal to cover vents. Make sure your garbage cans and other storage bins have tight-fitting lids.

Rodents leave a trail of evidence as they travel through your home and scout out new nesting sites. You can identify their tracks or runways by observing smudge marks (rodents have oily hair) or noticing footprints or urine stains, especially along walls. You can also see their gnawing marks, usually a sign of an active rodent problem.

Gnaw marks can be light or dark depending on the rodent species — mouse gnaw marks are softer and shiny, while rat gnaw marks are harder and darker. You can also inspect for fecal pellets, droppings, and gnawing damage. Fecal pellets help determine the rodent type and indicate the size of the infestation. Droppings are found throughout the home in corners, floors, furniture, stair railings, and walls. They have a distinct, musky odor and are quite sticky when fresh. You can also look for gnawing damage in and around your home’s exterior.

The best time to look for signs of a rodent problem is during their period of peak activity, usually just after dusk. It would be best to watch for any scurrying sounds during this time. Rodents are fond of attics, which provide dark, secluded spots for building nests and storing food items or family heirlooms. You can also check for their runways along walls or behind stored boxes and furniture. You can also check for smudge or grease marks on pipes, joists, and rafters. Finally, you can check for urine stains, which fluoresce under black light and have a strong, musky odor.

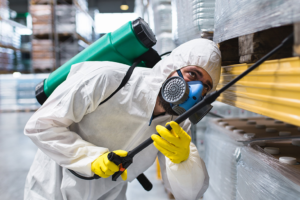
If you suspect a rodent problem, hiring a professional pest control technician knowledgeable about rodents and vermin is important. It would be best to choose a pest control specialist who treats rodents instead of general pests like ants and spiders, which are also common in Seattle. In addition to providing a thorough inspection, your licensed pest control professional can evaluate the amount of rodent exclusion (also known as rodent proofing) needed in your home.

Rodents are a major pest problem in homes and businesses, causing damage to property, food supplies, livestock, and structures. They are also significant disease carriers, transmitting fleas, ticks, and other parasites that can cause illness in people and pets. Rodents are responsible for millions of dollars in structural damage each year by chewing on wood supports and other materials, including electrical wiring.

Trapping is a key component of a rodent control program. Depending on the trap type, bait, and setting, it may be used instead of pesticides for a more environmentally friendly approach to rodent removal. Some traps require no bait, while others utilize a bait box to attract rats to the trap for a quicker kill. The trapping process can be very messy, so a professional should be consulted before this method of rodent control is used.

Mousetraps, rat traps, and specialized traps for invertebrates, such as spiders, are commonly used to remove rodents from properties. The traps can be spring, barbed wire, wooden boards, or a glue system. Some of these traps are safe for children and pets, allowing homeowners to relocate the rodents rather than kill them.

Rats are most active in the fall and winter when looking for warm places to nest and feed. They often seek shelter in attics, basements, and crawl spaces. The mice and rats will chew through wooden supports, drywall, and insulation in these areas, creating a fire hazard and compromising the structure’s integrity. They will also generate rodent nests in attics, which can block vents and ducts and lead to moisture issues inside the home.

To make a property less rat-friendly, keep garbage securely sealed in containers, clean pet dishes right after feedings, and store firewood at least one foot off the ground. Removing overgrown shrubs, bushes, and trees close to the home is also a good idea. The rodents can hide in those areas and jump over the roof to enter homes—professionally trained.

Rodents may be cute, but they’re a major pest problem for homes and businesses. They chew through wires, contaminate food and building materials, spread disease, cause fires, and create unsanitary conditions. Rodents are also known to attract other pests, including fleas and ticks.

Rodent droppings are a sign of an infestation, as are caves outside and scratching sounds inside the home. Other signs include rodent tracks, runways, rub marks, and gnawing in areas where food is stored. The smell of urine and feces is another indication of a problem.

Rats and mice are opportunistic pests that can find their way into homes, apartments, and businesses through the smallest cracks and crevices. To prevent these rodents:

  1. Thoroughly inspect your property regularly, especially in dark and secluded spaces.
  2. Look in crawl spaces, behind appliances, and near the roof and soffit areas for signs of rodent activity.
  3. Trim trees and shrubs so they don’t touch or provide shelter for your home.

You can also protect your home and reduce the risk of rodents by storing food in airtight containers, cleaning kitchen counters after meals, keeping food and trash tightly closed, and sanitizing garbage cans. Keeping pet food and litter in airtight containers is also a good idea.

If you spot signs of a rodent problem, eliminate the infestation as quickly as possible. A professional can perform an inspection and recommend the right treatment plan for your situation.

Hardwood Floor Services

Proper Preparation is Essential for Hardwood Floor Refinishing

Hardwood Floor Refinishing Bergen County NJ is an important and time-consuming process that can make your hardwood floors look like new. Refinishing can also prevent the need for expensive repairs or replacements in the future.

Hardwood Floor Refinishing

Before refinishing your wood floors, you should prepare the room by moving all furniture and houseplants. It is also important to clear the room of dust and debris. Vacuuming is recommended between each refinishing step to maintain a clean work area.

Whether you’re installing new hardwood floors or refinishing existing ones, proper preparation is essential for both. If not done correctly, installation and refinishing will be more difficult, and your floors may not perform well or last as long.

Before you begin refinishing or installing hardwood, clear the room and remove all furniture and decorations. You should also protect any walls, windows and doors that are exposed to the work area. You will also want to build a dust containment system and wear appropriate clothing and safety gear. If you’re a moderately handy homeowner, the prep process can be relatively quick and easy.

The condition of your wood floors is a key factor in determining when it’s time to refinish them. If the boards are visibly worn and have major scratches, gouges or dents, it’s probably time to refinish them. The type of finish on the floor can also affect longevity. Oil-based finishes can wear down much faster than water-based ones.

If you’re not sure whether refinishing or resurfacing is the right option for your home, consult with a professional flooring expert. They can help you understand the differences between the two processes and make recommendations based on your floor’s condition and your budget.

Refinishing involves sanding down the boards, which can take two to four days depending on the size of the room and the condition of the wood. Once the sanding is complete, the floors will be stained. This step can take one to two days and should be allowed to dry before you return to the room.

You can refinish your hardwood floors by yourself with the right tools. You’ll need a power sander and a drum sander, as well as a vacuum and dust extractor. You should also use a low-VOC finish, which will minimize indoor air pollutants and reduce your risk of developing health problems such as asthma and bronchitis. It’s also a good idea to read the manufacturer’s instructions carefully, as there will likely be guidelines for how long your materials should acclimate to the environment before you begin working with them.

Sanding

When a professional is working on your hardwood floors, they will use a dust containment system and take other precautions to protect the rest of your home. They will also have special equipment for sanding, so that the majority of the dust will be trapped in the machine and not dispersed throughout your home. If you’re tackling the refinishing process yourself, be sure to lay down a tarp in the room where your work is being done and use a vacuum with a HEPA filter or dust attachment to get as much dust out as possible before you start sanding.

Sanding the floors to remove the old finish is a labor-intensive job, but it’s one of the most important steps in refinishing. The process requires careful attention to detail so that you don’t end up with uneven boards or deeper scratches, which can be difficult to repair. Using a buffer or hand-held pole sander with a fine 120-grit sandpaper will create the smoothest surface possible.

After sanding, the floor should be thoroughly cleaned again to remove any remaining dust or dirt that may interfere with the final result. Then, a new coat of finish can be applied. The finish helps to protect the floors from water and daily wear and tear, while adding a hint of color and shine. Most floors will benefit from two or three coats of finish.

Before applying the finish, you will need to buff again with a buffer or hand-held pole grit to remove any minor scratches caused during the sanding process. Buffing will ensure that the new finish is able to bond effectively with the wood.

Once the floor is completely buffed and dry, it’s ready to be sealed. Most people choose a polyurethane sealant, which will help to protect the wood from water and everyday wear and tear. It’s a good idea to apply several coats, and it’s important to allow each one to dry fully before walking on the floors or moving furniture back into the room. Polyurethane is available in oil- and water-based formulations, and you can choose between a matte or high-gloss sheen.

Staining

Hardwood floor staining is one of the most dramatic and lasting changes you can make to your home. It’s also an important step in refinishing, since it protects the wood and adds a pop of color. Staining is a time-consuming process, but it’s worth the effort to bring new life to your old hardwood floors.

Before you start the staining process, be sure to thoroughly clean your hardwood flooring. This includes dusting, vacuuming, and cleaning the corners and edges. You should also wipe the boards down with a damp cloth. This will remove any remaining dust and debris and ensure that your finish adheres to the wood evenly.

It’s also important to choose a high-quality stain, especially if you’re doing the work yourself. There are a variety of oil and water-based stains, each offering different finishes and colors. Choose a stain that suits your style and matches the rest of your home’s décor.

When you’re ready to start the staining process, it’s best to work in small areas at a time. This will minimize the amount of stain you use, and it’ll also allow you to cover the surface area more quickly. It’s also a good idea to wear protective gear while you’re working, including gloves, goggles, and a respirator mask. Staining can produce strong fumes that are harmful to your health, so be sure to ventilate the room properly and open windows if necessary.

Once you’ve finished staining, wait a day or two for it to dry. Then, apply a coat of polyurethane. Polyurethane is an important final layer that helps protect the stained wood from scratching and fading. It’s a good idea to use a low-VOC polyurethane, which will emit fewer indoor air pollutants.

Refinishing hardwood floors can be a complicated project, but it doesn’t have to be expensive if you hire a professional. A reputable hardwood flooring company can guide you through the entire refinishing process from start to finish, saving you both time and money. However, refinishing can be dangerous for DIYers without proper training and equipment. If you’re not comfortable with tackling the project yourself, hiring a pro is a smart choice.

Finishing

Refinishing your hardwood floors takes a certain amount of skill and patience. A professional wood flooring contractor will have the experience and tools to complete the job quickly and efficiently, leaving you with a gleaming floor that will last for years to come. They will also know how much stain is needed and the best color to apply, as well as the type of finish that will last the longest. If you decide to do the refinishing yourself, be sure to read up on the process and take all precautions to avoid any dust or debris getting into your home. Many homeowners choose to put down a tarp or seal off the room completely to prevent this. It is also important to vacuum frequently to remove all of the fine dust particles that will be generated during the refinishing.

Once the sanding is done, it is time to stain the hardwood floors. The best type of stain to use is a low to no-VOC finish, as this will be better for your indoor air quality. This will also help your floors last longer, as they will not be exposed to harsh chemicals that can wear down the floor over time.

When applying the stain, be sure to follow the instructions on the label and let it dry for a few hours before moving back into the room. Once the stain is dry, it is a good idea to vacuum again to remove any remaining dust that may have settled. After that, it is a good idea to wipe down the hardwood with a damp cloth or mop, just to make sure that there is no dust or residue left behind that could mar the final product.

Concrete Contractors

Concrete Repair Techniques

Concrete is used in various areas around our homes. It is a durable material, but it is not indestructible. It is important to fix damaged concrete before it causes structural problems.

Concrete Repair

The best way to Concrete Repair Morgantown WV is by using the right concrete repair materials. These materials must have the right ingredients, texture and cost.

Concrete repair jobs involve a variety of surface preparation techniques depending on the geometry and structural requirements. For example, some cracks are dormant and not structural but they need to be routed and sealed so that water doesn’t infiltrate.

In this situation, contractors can use a commercial-grade concrete sealant with a wide range of hardness and flexibility properties to meet the needs of the project. The key to a successful crack sealant is proper preparation, such as high pressure air blasting the crack to remove dirt, dust, loose debris and any contaminants like paint or oil that may break the bond between the repair material and the concrete.

Contractors can choose from a number of repair materials that include epoxies, silicones and polyurethanes. Each material has its own characteristics, such as tensile strength, moisture tolerance and crack movement tolerance. For instance, a low-modulus epoxy’s ability to expand and contract with the movement of concrete cracks will help maintain a stable repair while a high-modulus urethane can handle significantly more movement.

Epoxy injection binds or welds cracks with widths as narrow as 0.002 in together, restoring the concrete’s integrity including its stiffness and strength. It is most effective for repairing wet and leaking cracks with a ductility that can accommodate future movements of the concrete structure.

This repair option requires a high degree of technical skill and equipment to be performed correctly. It is also more expensive than other repairs, but it’s an excellent choice for addressing the root cause of a concrete problem.

Epoxy injection requires drilling holes at close intervals along horizontal, vertical or overhead cracks. A non-sag epoxy is then injected through the ports and into the crack to fill and seal it. Moisture tolerant epoxies are available, but they will not restore as-design strengths and can’t resolve cracks caused by corrosion or design errors.

Stitching

Stitching concrete repair jobs involves the use of carbon fiber grid stitching embedded into a structural epoxy adhesive. It is considered a true structural concrete crack repair technique that actually helps slow down or stop concrete from continuing to crack, and has proven to be very effective in both commercial and residential applications. The system is also very cost-effective compared to other concrete repair methods and offers a full warranty against future cracking.

As a concrete repair technician, you’ll be working on your own for most of the workday, so it’s important to have an independent mindset and take responsibility for the projects that are assigned to you. Showing that you can manage these repairs without the help of a supervisor will allow you to advance in your career, and may even open up new pathways into management or franchise ownership.

Depending on the type of concrete surface that needs to be repaired, different repair techniques will be required. Common small concrete repair tasks include spalling repair, joint repair and slab jacking, levelling and decorative repair. Spalling is the process of deterioration of concrete, which leads to a rough or pitted surface and requires filling and patching to repair it. Joint repair can be done by re-colking or re-grouting, and is usually done to improve the appearance of the concrete structure. Levelling involves injecting a grout mixture under the concrete to raise it back to its original level, and decorative repair can be done by applying a coat of sealant to enhance the look of the concrete.

A successful concrete repair job requires proper preparation of the area to be repaired. This includes cleaning the existing surface, if necessary, and making sure that all factors that contribute to cracking are addressed in the repair design. It’s a good idea to walk-through the repair area with your repair contractor to discuss these issues and determine how they will be addressed in the actual repair job.

Having the right tools and equipment for a repair job will also be crucial to its success. For example, a concrete repair contractor should have a variety of tools, such as a caulk gun, paddle mixer, a wire brush and a number of hand trowels (including a finishing trowel, margin trowel and pointed trowel). A good concrete repair mix manufacturer will provide contractors with a product that is designed specifically for the job in question. Using the correct product for each repair job will prevent the concrete from being damaged or failing prematurely.

Prestressing

Whether it’s a concrete slab forming a sidewalk or an old parking garage column, the same basic principles apply to any concrete repair job. The first step is determining the cause of the problem, which could include destructive testing to reach reinforcement and find any indication of corrosion. Then, the contractor can address the issue.

Often, structural concrete is designed to be reinforced with steel bars or rods to support heavy loads and reduce deflection. However, a more innovative approach to this construction material is the introduction of internal stresses into the concrete to better resist the tensile forces that can result from loading. This is known as prestressed concrete, which has its origin in bridge building and has become more common in structures such as commercial buildings and parking garages.

The concept of this method is similar to stacking books together, then pressing tightly on both ends. The end result is a much stronger unit that can support great weight from both sides without falling apart. This is the idea behind prestressed concrete products, which can also span great distances and use less concrete than traditional reinforced concrete beams.

Concrete can be prestressed during its production through a process called pre-tensioning or post-tensioning. In this form of the construction material, curved ducts are formed into the concrete and steel tendons, usually high-strength wires or alloys, are then pulled tight and anchored externally to achieve a prestressed state before the concrete is poured and cured. This internal stress balancing of strengths is beneficial to the overall strength of the structure, allowing it to better resist lateral and torsional stresses.

Dry Packing

A dry pack concrete repair job involves filling the gap with mortar that has been pre-blended and is ready to use. The mix contains masonry sand, Portland cement and water. It differs from normal concrete in that it does not contain aggregate like pebbles, which makes it more dense and able to withstand pressure from water better. Dry-pack mortar is often used in repairing basement walls and has many other uses around the home.

The mortar is placed in layers and compacted with a hardwood stick. A groove is put on the surface of each layer to help with bonding with the surrounding concrete. A minimum of 14 days must be allowed for the repair to cure.

For a small project, dry pack can be mixed in a wheelbarrow with a shovel. However, large projects may require a portable mixer that will save time and effort. A concrete mixer with a drum attachment can be used to create a consistent mix, and it is possible to add in some water as needed. When mixing, safety precautions should be followed to avoid breathing in dust and dirt particles. A pair of gloves, safety goggles and a face mask are all recommended.

If a machine is being used to apply the mortar, the operator should make sure it is a good quality, with a good motor. The machine must also be kept clean and free of oil and other contaminants that could contaminate the mix. A high-quality machine will have a low noise level and produce very little air pollution.

During the drying process, moisture-sensitive plastic surface-mount devices should be kept in moisture barrier bags to prevent popcorn cracking. This occurs when the internal moisture of the plastic package vaporizes rapidly during board mounting and causes the device to crack. Moisture ingress into the plastic is also a major cause of corrosion in industrial machinery and equipment. This is another important reason why a professional should always inspect equipment and repair any damaged components.

Home Inspection

Why You Should Use an Insulation Remover

Insulation removal is a necessary process when old insulation is damaged, contaminated, or no longer effective. It is important to ensure that future insulation is installed properly to maximize energy efficiency and comfort.

Performing an attic insulation removal can be very hazardous and should be done by professionals only. A variety of safety precautions should be taken into account when undertaking this task. Visit https://perthinsulationremover.com.au/ to learn more.

insulation removal

Hazardous materials are present in almost every type of insulation and in many home renovation projects. This is why a professional abatement contractor should always be used for such jobs. They are well trained to identify and remove these materials, protecting you from exposure and helping you avoid fines and lawsuits.

Hazardous substances in old insulation include asbestos, lead, and other chemicals. Many of these are harmful to human health, especially when they become airborne and inhaled. They can also pose a risk to the structure of your home, increasing the need for costly repairs.

Contaminated insulation should be removed immediately, as it poses a serious health risk. It is a breeding ground for mold and pests, which can spread throughout your home, leading to serious structural issues. In addition, mold and pests are a fire hazard, making it important to have your old insulation removed as soon as possible.

When asbestos, lead, and other toxic chemicals contaminate your insulation, they can release dangerous gasses into your home. These gases can harm your respiratory system and even cause cancer. They can also damage the integrity of your walls, ceilings, and floors. Removing contaminated insulation is an essential part of a home remodel and improvement project, as it helps ensure the safety of your family.

Whether your insulation needs to be replaced because of mold outbreaks, pest infestations, or it’s just old and outdated, new insulation is the best way to improve your home’s indoor air quality. Old and damaged insulation can harbor allergens like dust, mold spores, and pet dander. This can contribute to asthma, allergies, and other respiratory distress in your home’s occupants.

Depending on the type of insulation, it may be recyclable. Some cellulose and fiberglass insulation can be recycled into new products to save energy and resources. Other types of insulation, such as spray foam, can contain hazardous chemicals and should be disposed of in accordance with manufacturer instructions and local waste management guidelines. It’s also a good idea to wrap and seal insulation to prevent the release of harmful fibers during removal and disposal.

The quality of air within homes and other buildings has a direct impact on the health of those who live or work inside them. Research has linked poor indoor air quality to a wide range of symptoms and diseases, including asthma, respiratory problems and even cancer.

Insulation plays a role in both the indoor air quality and energy efficiency of a building. It keeps outside air from seeping into living spaces and helps to make heating and cooling bills more manageable. However, over time insulation can become damaged and may no longer serve its purpose. This can happen due to pest infestation, rodent urine and feces, water damage or simply wear and tear.

When this occurs, it is important to have the old insulation removed and replaced to prevent harmful pollutants from being blown into living areas. Professionals can help with the process by using special equipment that sucks up the old insulation and any other debris from an attic space, leaving only fresh “make-up” air behind. These machines are often gas-powered and will be equipped with industrial hoses that can reach across an entire attic to efficiently remove the material without spreading it throughout the house.

In addition to removing the old insulation, professionals will also take the opportunity to check for signs of mold and other structural risks in the attic space. This will give them a good idea of the overall condition of the home’s attic and may prompt other services to be performed, like repairing damaged roof components and sealing attic penetrations.

Removing insulation can also improve a building’s energy efficiency by allowing for the proper sealing of any attic penetrations and reducing air leakage. This will keep the home warm in winter and cool in summer. It can also save on energy costs, as well as helping to reduce carbon emissions. The combination of air sealing and insulation can greatly increase a home’s energy efficiency. This is especially true in older homes with worn and outdated insulation.

Mold in insulation is a dangerous and difficult problem to resolve. It is important to follow the proper safety procedures when handling contaminated insulation to prevent the spread of mold spores throughout your home. The first step is to determine whether the insulation is contaminated with mold by visually inspecting it. If you notice any signs of mold, you will need to remove and replace the insulation. Mold in insulation can be caused by many different things, such as water leaks, high indoor humidity, and improper installation. The best way to avoid mold in insulation is by preventing moisture problems, which can cause mold and mildew growth.

If you suspect that your insulation is contaminated with mold, it is a good idea to take a sample and test it for mold contamination using a black light. This will help to determine whether the insulation is safe for your family to reinstall. You can also use a commercial mold testing kit to find out if your insulation is contaminated with mold.

Depending on the type of insulation, some forms of mold are more toxic than others. The most common types of mold found in attic insulation are penicillium, aspergillus, and Cladosporium. All of these molds are multinucleated filamentous fungi with a thin cell wall that makes them more susceptible to physical damage than most plants.

While no type of insulation is mold-proof, avoiding moisture problems can greatly reduce the risk of mold in your insulation. Preventing moisture problems by controlling dampness in crawl spaces, attics, and basements, ensuring that foundation drains are functioning properly, and cleaning up spills promptly are the best ways to control mold in your home.

If you have a serious mold infestation in your insulation, it is best to hire a professional to handle the removal process. will ensure that all safety measures are followed during and after the insulation removal process to eliminate the risk of mold spreading to other parts of your home. They can also recommend residential contractors to perform repairs on the areas of your home where the insulation was removed.

Insulation removal is a task that requires specialized equipment and safety precautions. This is because insulation material may contain toxic materials such as formaldehyde and carcinogenic asbestos.

When these materials are disturbed, they can become airborne and irritate the eyes, skin, and respiratory tract of people working on the project. For this reason, the use of protective gear is essential when removing attic insulation, such as masks and gloves. Other safety precautions include clearing the work space of furniture, sealing off the area from the rest of the house, and establishing a clean work zone.

Old insulation can be a hotbed of allergens, especially dust and mold spores, which are harmful to the indoor air quality of a home. These contaminants can also cause health problems such as asthma, itchy nose and throat, and chronic coughing. Removing it and replacing it with new insulation improves the quality of a home’s indoor environment.

In addition to promoting a healthy living environment, removing and replacing old insulation also helps increase a home’s resale value. The improved energy efficiency and comfort resulting from new insulation will attract buyers who are interested in purchasing the property.

Professionals assess the type and condition of the insulation before determining the best way to remove it. They typically use a variety of techniques, including cutting, vacuuming, and scraping. The contaminated insulation is then placed in designated disposal containers or recycled.

Before attempting attic insulation removal, it is important to make sure the power is turned off and all live wires are disconnected. This will prevent damage to the electrical systems and minimize the risk of injuries or fires.

It is also essential to clear the attic space of furniture and boxes before removing the insulation. This will create room for the professionals to work and reduce the risk of causing damage or contamination to the items stored in the attic. In addition, the attic space should be sealed off to prevent dust and debris from escaping the work zone and contaminating other parts of the house. Finally, the professionals should use a filtering vacuum attachment to separate the debris from the remaining blown-in insulation.